Fried

  1. No Syrup Required

    January 14, 2013 by The Squishy Monster

    When I was little, sometimes we’d have these savory Korean pancakes for breakfast and boy was it difficult to explain to my friends that these were thin and crispy, filled with vegetables or seafood, not the fluffy variety where golden stacks required sticky syrup.  I hope that despite being unconventional, you’ll give these glorious crispy bits a try.  The edges brown as it sputters in its drizzle of oil and the seafood swells up as the green onions spread their mild aroma around in the pan.  Each mouthful lends you a bite of this, that, and more.

    How to Make Korean Seafood Pancakes 해물파전

    5.0 from 7 reviews

    Seafood Pancakes
     
    Prep time

    Cook time

    Total time


    Author:

    Ingredients
    • 2 c unbleached all purpose flour
    • ½ c rice flour (not sweet rice)
    • 1¼ ts fine salt
    • 2¼ c cold filtered water
    • 1½ c seafood of your choice
    • 3 chopped green onions
    Dipping Sauce
    • ¼ c soy sauce
    • 2 ts toasted sesame seeds
    • 2 ts sesame oil
    • ½ ts minced garlic
    • 1 chopped green onion
    • 1 ts red pepper flakes
    • 1 ts vinegar

    Instructions
    1. In a bowl, sift together your dry ingredients. Begin whisking in your water.
    2. Fold in your seafood and green onions.
    3. In a hot pan with at least 1 tb of peanut/canola/veggie oil, fry your pancakes individually and flip only once when it achieves a golden brown color.
    4. For the dipping sauce, bring all your ingredients together and stir.

    Lots of love and big hugs from me and my mama,

    Your Squishy Monster ^.~


  2. Apple Pickin’ and

    October 18, 2012 by The Squishy Monster

    Since I can no longer go trick or treating, this was my version of festive October fun.  I always had homemade costumes as a kid and went as a princess several times.  What would you dress up as?

    {Gala Apples}

    {Stayman Winesap}

    Apple Cider Donuts

    Apple Cider Donuts
     
    Prep time

    Cook time

    Total time


    Author:

    Ingredients
    • 10.5 g Yeast
    • 1⅓ c Apple Cider
    • 60 g melted unsalted Butter
    • ½ c whole Milk
    • 84.5 g Sugar
    • 2 Eggs
    • 470 g Flour
    • ½ ts fine Salt
    • 1 ts Baking Powder
    • ½ ts Baking Soda
    • ½ ts Cinnamon
    • ⅛ ts Nutmeg
    • ⅛ ts Allspice
    • ⅛ ts Cloves
    • Oil or Shortening for Frying
    Glaze
    • 3 c Powdered Sugar
    • ½ c Apple Cider

    Instructions
    1. Gently warm your Apple Cider but make sure it’s not hot or it will kill your yeast. Sprinkle in your yeast. (Mine read at about 105)
    2. In a mixer, tip in all the following: Butter, Milk, Sugar, and Eggs. Mix to combine.
    3. In a separate bowl, weigh out and sift your Flour, Salt, Baking Powder/Soda, and Spices.
    4. In 3 or 4 separate additions, combine your Flour mixture with your wet mixture.
    5. Cover with a towel and allow your dough to rest for 60 minutes in a warm/draft free place. (A cold oven or pantry works fine).
    6. Afterwards, on a lightly floured surface, knead your dough for about 5 minutes. You want to make sure you don’t add in too much flour or your finished product will be tough and dry.
    7. Roll out your dough to about a ¼-1/2 ” thickness and cut out donut shapes.
    8. Heat up your oil to 350-375 and fry in batches. Allow to cook 1-2 minutes on each side.
    9. Scoop with a slotted spoon and allow to drain and slightly cool.
    10. To make the glaze, whisk together the Sugar and Cider. Submerge each side of your donut into the glaze and sit on a cooling rack to set.
    11. These are best eaten the day of.

    I cannot be held accountable for how many you eat.  I will happily serve as your guinea pig and tell you this much: you can eat 9 and not die ;)

    Doughnuts & Donuts,

    Love,

    Your Squishy Monster ^.~


  3. Cheesy, Meaty, Crunchy, Gooey

    May 3, 2012 by The Squishy Monster

    Bacon-Cheese-Fritters.  With all things considered, it’s hard to think you need much more beyond that.  Of course, I say this facetiously, but I don’t imagine that I’m too far off.

    This idea sprung on me one morning as I sat eating a late Breakfast of heavy, streaky slices of Bacon, topped with melted, broiled Cheese, on crunchy, golden Toast.  These Bacon Cheese Fritters are exactly what I had for Dinner that night…an echo of an earlier meal but made even more delicious with the magical properties of hot, bubbling oil.

    This is even further accessible for the fact that a). they’re super easy and b). when a generous portion of Bacon is fried off and Cheese is grated earlier in the day, half your assembling work for dinner is completed.

    Here’s how to do it:

    Bacon & Cheese Fritters

    Bacon Cheese Fritters
     
    Prep time

    Cook time

    Total time


    Author:

    Ingredients
    • 2 c Shredded Mozzarella (Smoked is very nice)
    • 8 slices of crisped Bacon
    • ½ c Italian Bread Crumbs + healthy grating of Parmigiano-Reggiano (if you have any)
    • 2 beaten Eggs
    Egg Wash
    • 2 beaten Eggs + 2 tb Cream (or full fat Milk)
    • 2 c Panko Bread Crumbs

    Instructions
    1. Combine your ingredients together in a bowl
    2. Roll a spoonful or so of your mixture into a ball
    3. Dip your ball into your Egg-wash and roll into your Panko
    4. Chill all your prepared Fritters in the Fridge for at least 30 min
    5. Fry in batches (the oil should be at 360 or so–a fry thermometer helps)
    6. Retrieve your Fritters when they’ve reached a deep, golden brown. Remember not to overcrowd the oil and to leave at least 2 inches or so on top in your heavy bottomed pan.

    Notes
    If you’d like a flavored oil, plunge a stalk of fresh Rosemary into your Oil first for a few minutes. Great “frying oils” are ones with high smoke points= Safflower, Peanut, Canola, Veggie, etc. Remember that Extra Virgin Olive Oil should never be used for frying.


    Wishing everyone a delicious and Cheesy day!

    XOXO

    Your Squishy Monster =D


  4. Deep Fried South

    April 13, 2012 by The Squishy Monster

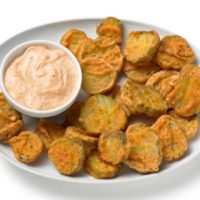
    If there’s danger in leaving me to my own devices and coloring everything Pink, there’s an equal probability that I want to deep fry it all too =D

    As a Kid, I actually abhorred anything deep fried (except French Fries because French Fries are awesome like that).  I remember going to a Seafood Joint with my “White” Cousins and hearing them whisper “Yea, I guess Koreans don’t like Fried Batter,” as I busily disrobed my baby Shrimp of its outer crispy clothing.  Quite the contrary, folks!  If ever in Korea, I hope that you have the pleasure of perusing through any busy street corner and frequenting the variety of Street Vendors there.  You can have Ddukbokki on a Stick (hell, anything on a Stick) and everything is served piping hot in a New York Minute.  There’s this great exhilarating rush that’s present in Korea that echoes that high energy and spontaneity of New York.  I believe that Koreans have their Frying down to an Art.  Virtually anything can be artfully cushioned in a light and crispy shell that delivers a most satisfying crunch.  Goguma (Korean Sweet Potatoes), Squid, and boy is Korean Fried Chicken delish…the possibilities are only narrowed by one’s own creativity and imagination!!  So it wasn’t far fetched for me to identify Fried Pickles as something potentially genius.  Here in town, everyone takes Fried Pickles as seriously as when the “Hot” Krispy Kreme sign lights up.  Best served extra crunchy, straight out of its bubbling oil bath with a serious dish of cool and creamy Ranch to dunk them in, they should have a firm bite from its oh-so-crispy shell, still warm in the center, and dripping with lots of the creamy, flecked white stuff =D

    How to Make Fried Pickles

    Fried Pickles
     
    Prep time

    Cook time

    Total time


    Author:

    Ingredients
    • 1 jar of Dill Chips
    • 1 c cold, whole Buttermilk+ dash of Hot Sauce
    • ½ c Flour + ½ c Cornstarch + ¼ ts Cayenne, ¼ ts Smoked Paprika, ½ ts Garlic Powder, ½ ts Onion Powder + lots of cracked Black Pepper
    • 2 Eggs
    • 2 c Cornmeal, Breadcrumbs or Flour

    Instructions
    1. Soak your Chips into your cold Buttermilk mixture for at least 15 minutes in the Fridge.
    2. Drain and dredge your Chips individually in your dry Flour/Starch mixture
    3. Shake off excess and dip your Chips individually in your Egg
    4. Coat your wet Chips into your Cornmeal, Breadcrumbs or Flour
    5. Lay in a single layer and refrigerate for at least 20 minutes before frying.
    6. Fry until golden brown (and floating to the top) in oil that has reached 350.
    7. Try not to overcrowd the pan and work in batches. Serve immediately with Ranch.

    Notes
    Ranch •1/2 c Sour Cream •1/4 c whole Buttermilk •1 ts dried Dill •2 ts fresh chopped Chives •1 ts Garlic Powder •1/2 ts Onion Powder •S & P

    Armed with an arsenal of all the good stuff to eat, I’m sure I’ll have lots of fun and yummies for the weekend–it’s what I hope for y’all too!

    XOXO
    Your Squishy Monster ^.^


  5. Revisiting

    December 19, 2011 by The Squishy Monster

    From this:

    To this:

    This was the last of Dad’s Green Onions which makes me super sad :(   Most of them had been glazed over by baby frost and wilted or been eaten up by the bunnies.

    So this was the last hooorah for the great Pajeon until next Spring.

    Korean Green Onion Pancakes:

    • 2 c Flour
    • 1/4 c Rice Flour
    • 1 1/2 ts Kosher Salt
    • 2 1/4 c Water
    • 1 1/2 c Green Onion

    Start off by frying with Veggie or Canola Oil.  Achieve a golden brown (this can take awhile so if you pop em into a 350 oven in a single layer for a few minutes, it’ll crisp up faster, but the old fashioned way works too).  The goal here is to make them as thin and crispy as possible.

    Serve immediately whole, or cut into wedges with:

    Scallion Dipping Sauce:

    • 1/4 c Soy Sauce
    • 3 ts Sesame Oil
    • 1 1/2 ts Sesame Seed
    • 1 ts Red Pepper Flakes (Korean Gochugaru (has no seeds))
    • 1 stalk of chopped Green Onion

  6. My Sunday…

    November 28, 2011 by The Squishy Monster

    Included Football in the background and WINGS!  Crispy, hot, succulent, and SPICY!  I swear, if I go a few days without having something spicy in my mouth, I start craving it pretty badly.

    From what I understand, Spicy is not considered a flavor but is registered by the brain as pain instead.  I also hear that it can aid in weight loss, help release endorphins, and that some sources of heat such as peppers contain high amounts of Vitamin C.  Whether this is true or not, I loooove spicy!

    Whenever I’m in Korea, I get the whole “all-you-can-eat” Chicken Wings Free For All Experience via my Uncles Chicken Shop.  He’s run a pretty successful hole in the wall shop for several years now and one of his most requested flavor are these Honey Sriracha Wings.  They’re Spicy, mellowed out by thick, golden honey.

    Honey Sriracha Chicken Wings

    Chicken Wings in Honey Sriracha
     
    Prep time

    Cook time

    Total time


    Author:

    Ingredients
    • 15-20 Chicken Wings
    For the Sauce
    • 4 Tb Melted Butter
    • 2 Ts Sesame Oil
    • 4 Tb Sriracha
    • 2 Tb Honey
    • 1-2 Ts Sesame Seed
    • 1 Ts Crushed Red Pepper Flakes
    For the Dry Coat
    • Equal parts Cornstarch and Flour + Salt and Pepper

    Instructions
    1. For the Sauce, combine everything in a large bowl together. (It helps to add in the Oil and Butter later on so it doesn’t start to set)
    2. Rinse your Wings under cold water and dredge in Flour/Cornstartch (with Salt & Pepper). Shake off the excess. If you’re patience enough, slide these into the fridge to chill for 30 min.
    3. Fry your Chicken at 350 (up to 375) in batches until they’re deeply golden brown and floating to the top. You want to make sure the Oil covers your Wings at least an inch or so on top. Mine took about 10 minutes to cook.
    4. Drain them on a brown paper bag.
    5. Toss to coat in the Sauce and serve hot with Blue Cheese and Celery/Carrots.

    Notes
    Toss when hot to absorb maximum amount of sauce — add in less Sriracha/omit Red Pepper Flakes or add in more Honey and add Brown Sugar if less Spiciness is desired =D


  • 1

    Welcome to The Squishy Monster!

    Here, I'll share the stories of my on going love affair with food as well as step-by-step tutorials/cooking videos featuring original recipes. I'm a firm believer that despite our differences, our one commonality as humans? Food.
    I'm 100% Southern & 100% Korean. My name is Angela and my friends call me The Squishy Monster.

  • Recent Posts
  • Support "Pack Away Hunger"